Hero Module
The Hero Module is a new part of the One Click Damage Blender add-on. It helps you add amazing details to your objects, like those made of stone, and it's great for many other kinds of objects too.
If you're working on something that needs to look very detailed, like models for close-up shots, 3D printing, or high-quality projects, Hero is perfect. Unlike the main part of the OCD add-on, which helps you quickly add details to lots of objects, Hero lets you focus on making one special object look extra good. You can place this object right where everyone will see it, adding special details easily without needing to sculpt.
Also, Hero is a great place to start if you plan to do more detailed work on your object later. You can use Hero to add basic details first, then go in and add more with sculpting.
With Hero, you can make your models stand out, adding depth and interest easily.
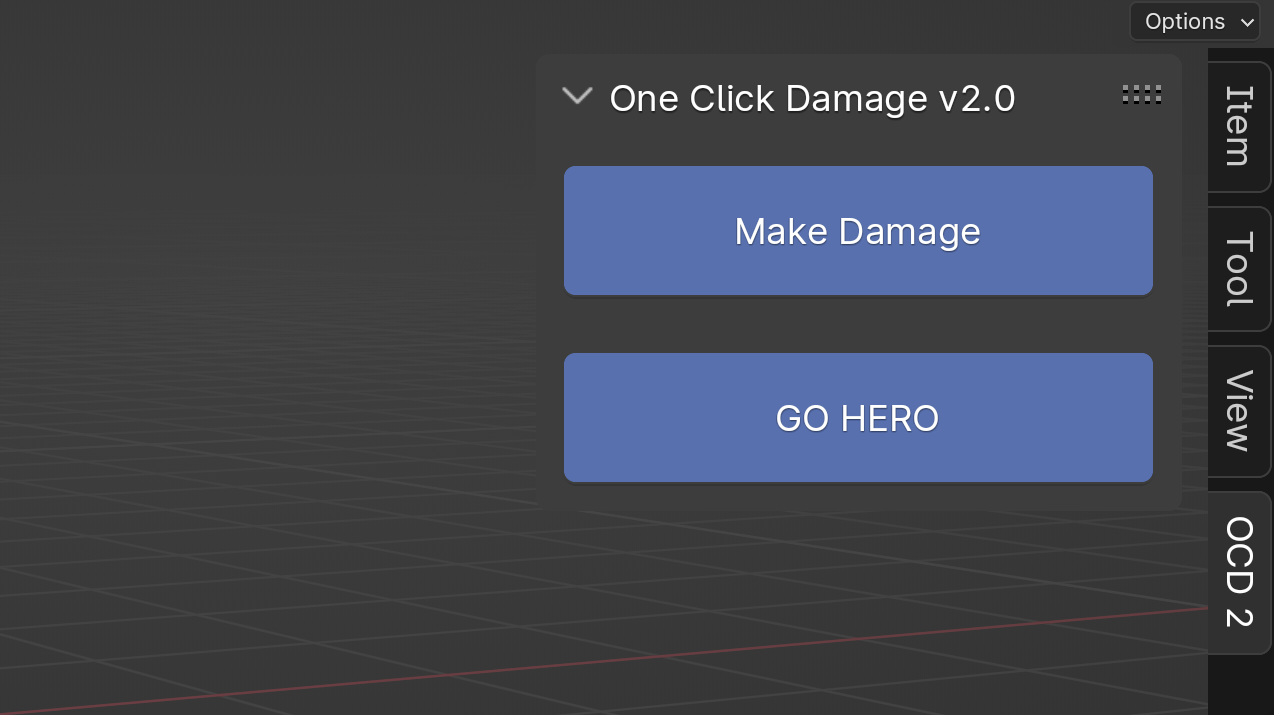
Activating the Hero
To start using the Hero Module, open the N-Panel in Blender and select the object(s) you want to detail. Then, just press the GO HERO button for the selected object(s). This will automatically add a special setup to your object, including a Geometry Nodes modifier and a basic HERO Node Tree to get you started.
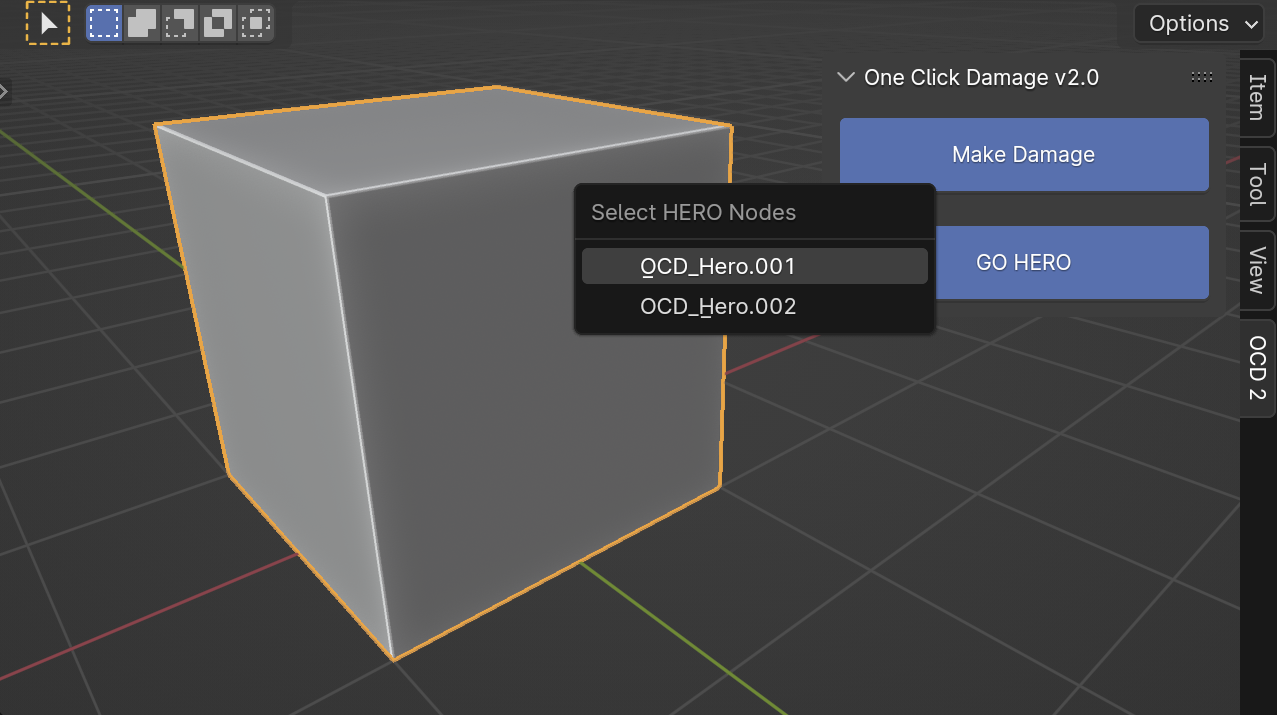
Warning
Clicking GO HERO adds a new Node tree each time, named like OCD_Hero.001, OCD_Hero.002, and so on. If you rename them, keep the OCD_Hero. part and just change the number to a name that tells you what it is, like OCD_Hero.Stone or OCD_Hero.Brick. This keeps things tidy and easy to find.
Hero Geometry Nodes Menu
You can also start using HERO right from the Geometry Nodes area. Just find the OCD Hero menu in the list.

Add Existing Hero
To use HERO again in your scene, you can pick an existing HERO Node Tree instead of making a new one. Just hold the ctrl key and click the GO HERO button. This will show a menu where you can choose from the HERO Node Trees you have.
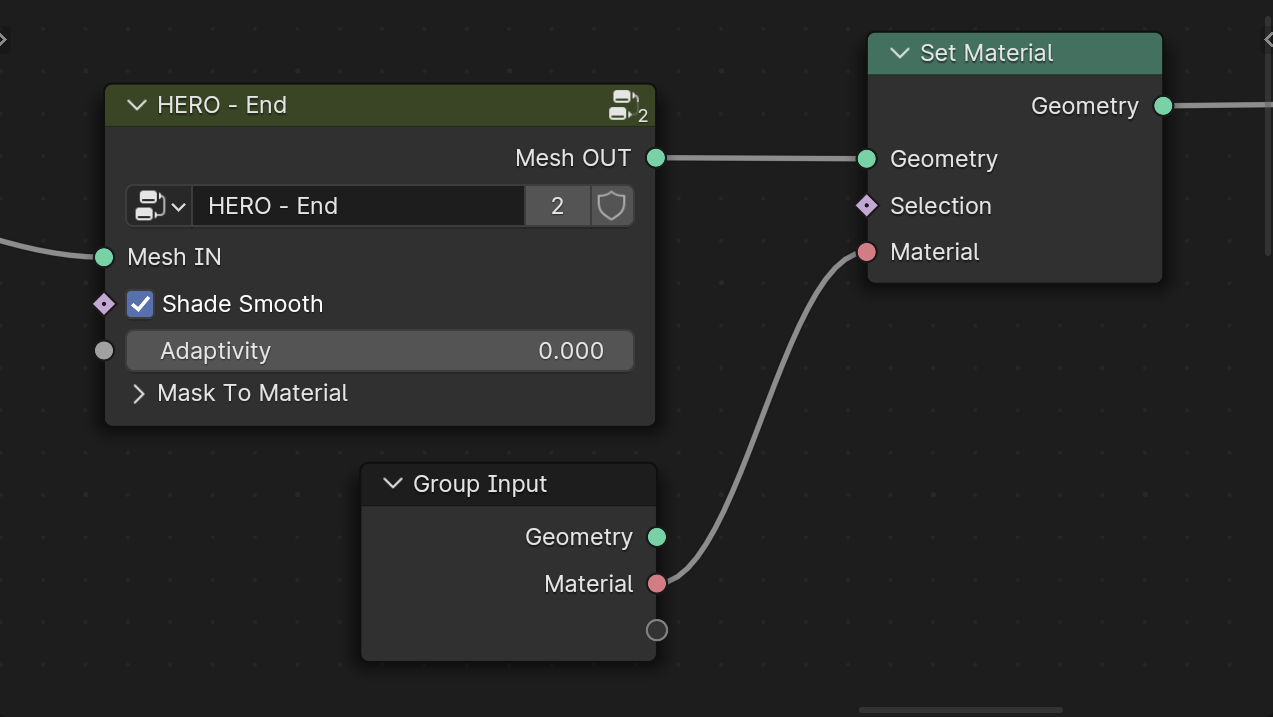
Assign Material
To assign a material to a HERO object, add a Set Material node at the end of your HERO chain and select the material from this node.
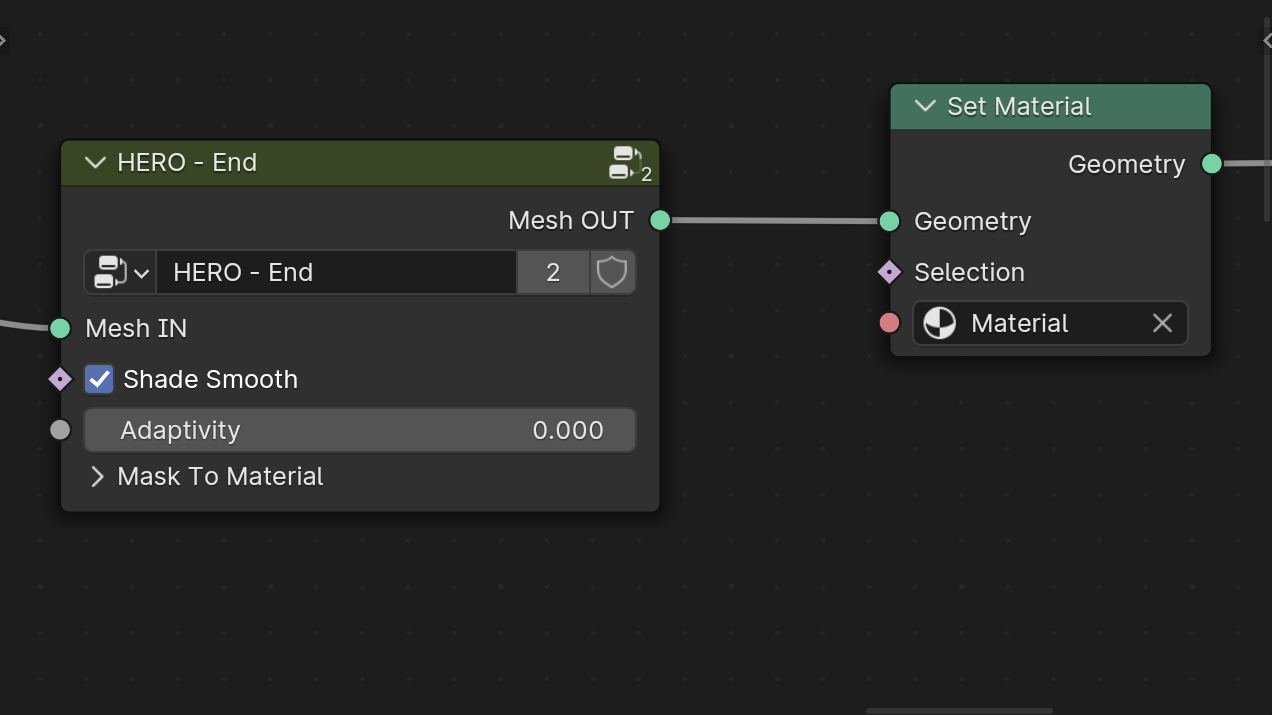
Note
To assign different materials to each object using a single HERO node tree, place a Set Material node at the end of the HERO chain. Then, connect the Material input socket to the Group Input. This setup will make a material selection field appear in the Modifiers section of the selected object, allowing individual material assignments.
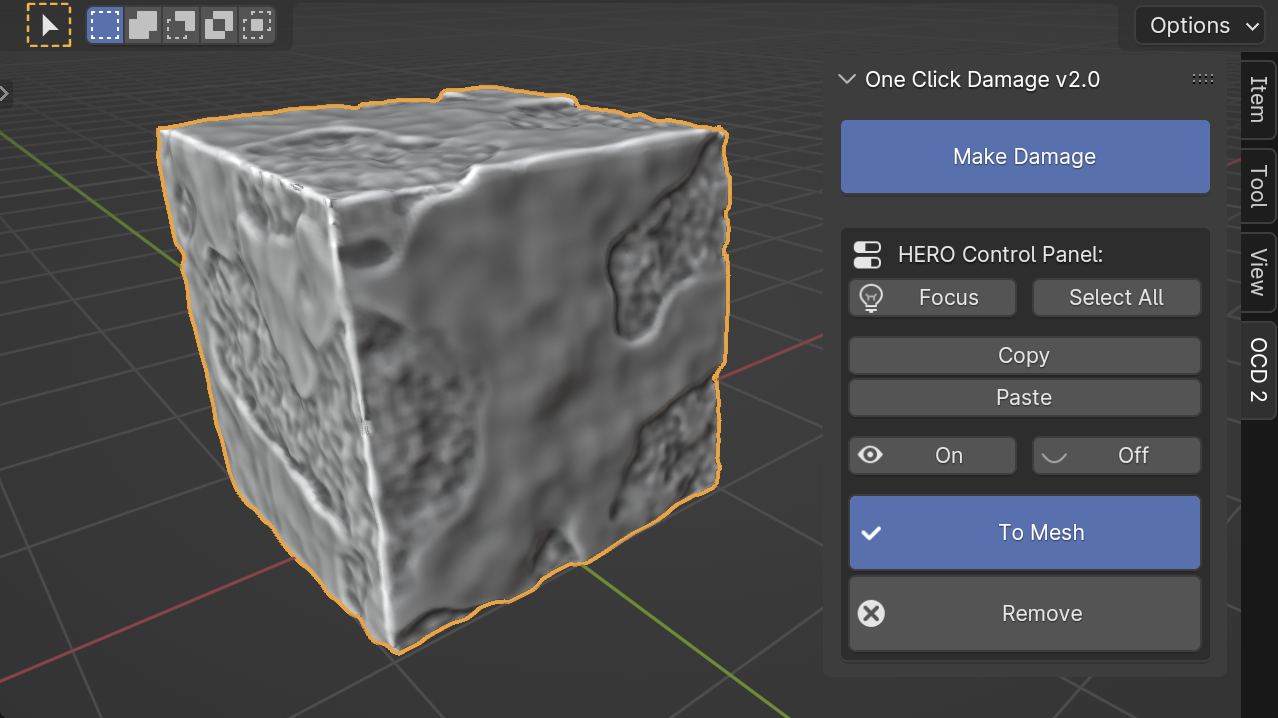
Hero interface
When you select an object with HERO applied, you'll see a new HERO panel. This panel has extra buttons that are very useful for working with your detailed objects.
Focus
The Focus button helps manage your computer's workload. When you change HERO details on many objects, it can slow things down. By clicking Focus, you can turn off HERO for other objects and concentrate on just the selected one(s), making things smoother.
Note
If you press the Focus button while holding the Ctrl key, you can isolate the selected object. This means it will hide all other objects, letting you concentrate on just the one you've chosen.
Select All
The Select All button helps you quickly select all objects that use the same HERO Node Tree as the object you've currently selected. This makes it easier to manage or modify groups of objects with similar details at once.
Copy and Paste
The Copy and Paste buttons are mainly used to swap HERO Node Trees from one object to another. To do this, first pick the object with the HERO details you wish to use and click Copy. Next, select the other object(s) where you want to apply these details and press Paste. This process changes the HERO Node Tree on the selected objects to match the copied one.
Note
You can also paste HERO details to an object that doesn't already have HERO active. To do this, make sure you select both objects at the same time: the one you're copying from and the one you're pasting to.
On / Off
The On/Off buttons allow you to toggle HERO for selected objects. This is very useful when you need to reposition your model without engaging the HERO Details.
Note
The Off button turns off HERO for the viewport only, meaning HERO will still be active and visible in the final render.
To Mesh
The To Mesh button converts the current HERO Details into a fixed mesh. After using this button, you won't be able to adjust the HERO Details anymore.
Remove
The Remove button takes away the HERO Modifier from the selected objects.
Hero Main Nodes
HERO - Start / End
The HERO - Start node is where you begin adding details. Most adjustments occur between the HERO - Start and HERO - End nodes.

Mesh IN
The Mesh IN socket is where you connect your input object.
Note
The object must be real (not an instance) and watertight.
Voxel Size
The Voxel Size parameter controls the level of detail. A smaller number means more detail, while a larger number results in less detail.
Warning
Keep in mind, higher detail (a lower Voxel Size number) requires more computer power.

Offset
The Offset parameter helps to inflate the geometry, helping to balance out deep dents when needed.
Relative Scale
The Relative Scale checkbox, On by default, affects Voxel Size based on object scale. Turn it off, and HERO applies the same voxel size to all objects, regardless of scale, making details consistent across sizes.
Ref Geo IN
Use the Ref Geo IN input to choose a specific object as a scale reference for HERO. Drag and drop your chosen object from the Outliner into the geometry nodes area; it automatically becomes an Object Info node. Then, connect this node to the Ref Geo IN input socket.
Preview Resolution
The Preview Resolution checkbox doubles the Voxel Size for quick previews. Use it when you want to tweak settings without processing all details.
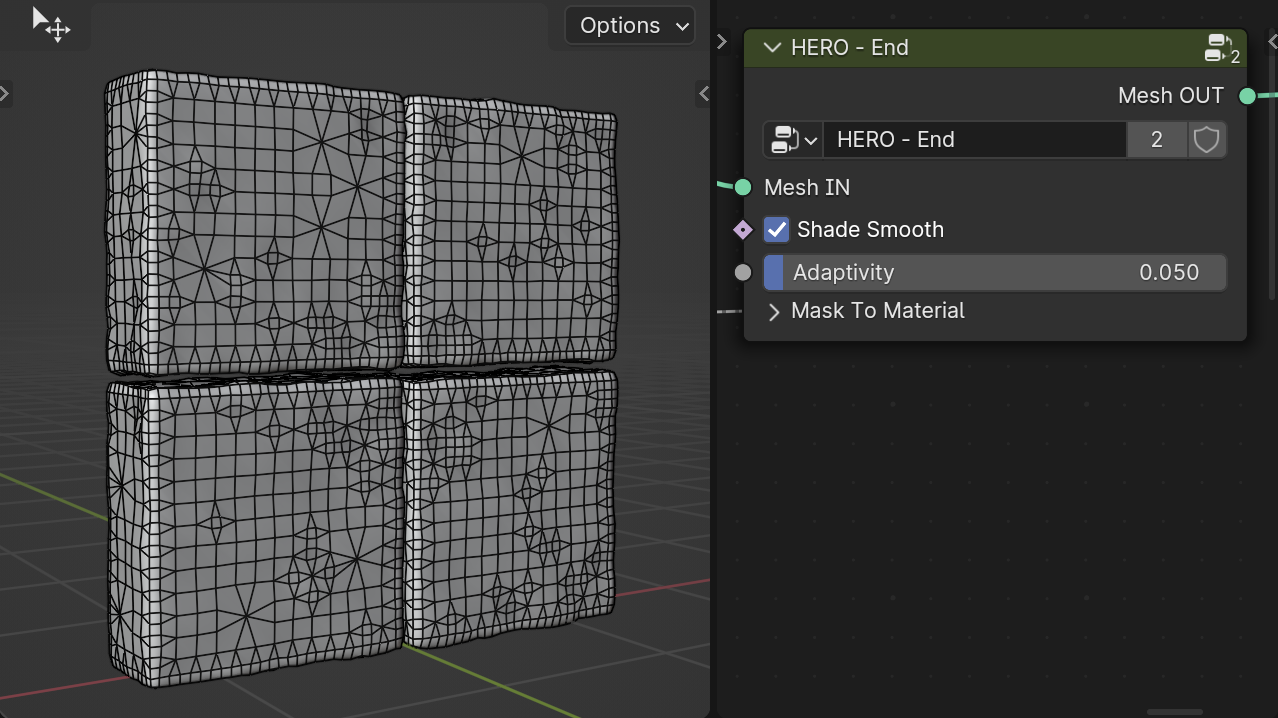
Shade Smooth
The Shade Smooth checkbox applies smooth shading to the object.
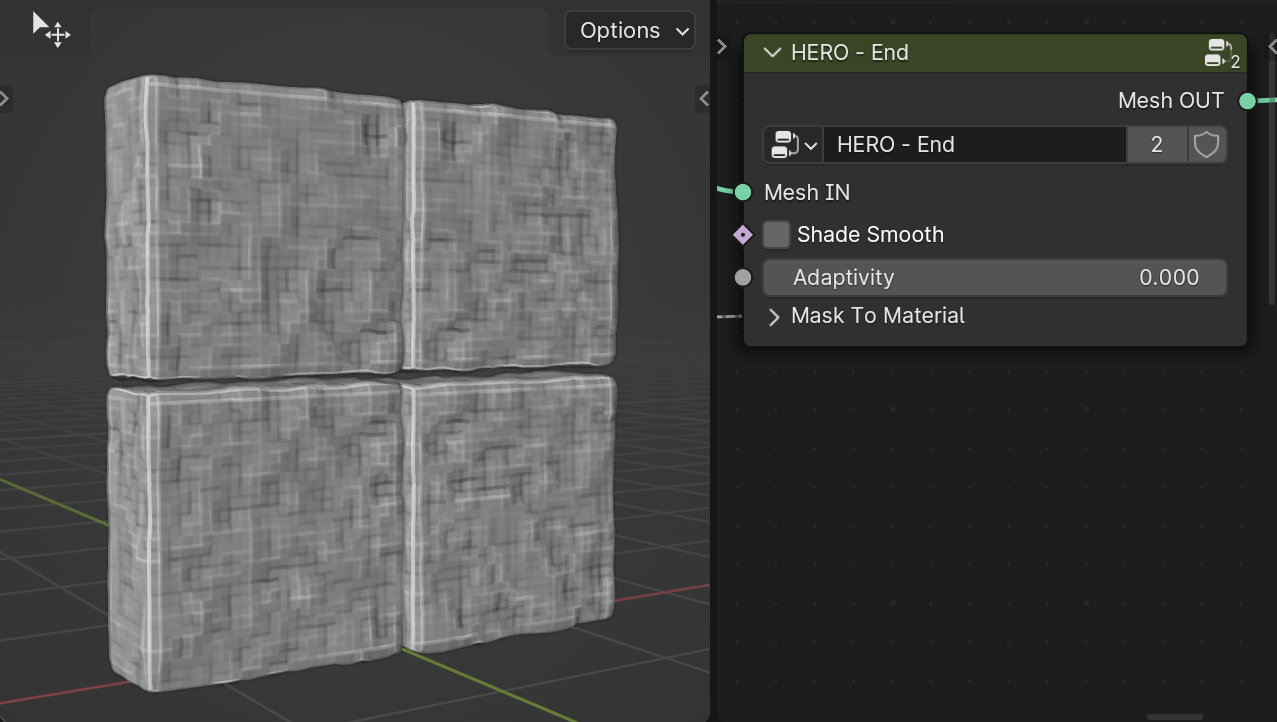
Adaptivity
The Adaptivity slider decreases the number of polygons while preserving detail.
Mask to Material
The Mask to Material section lets you use mask outputs in the shader editor. Just give a meaningful name and connect the required mask to its input.
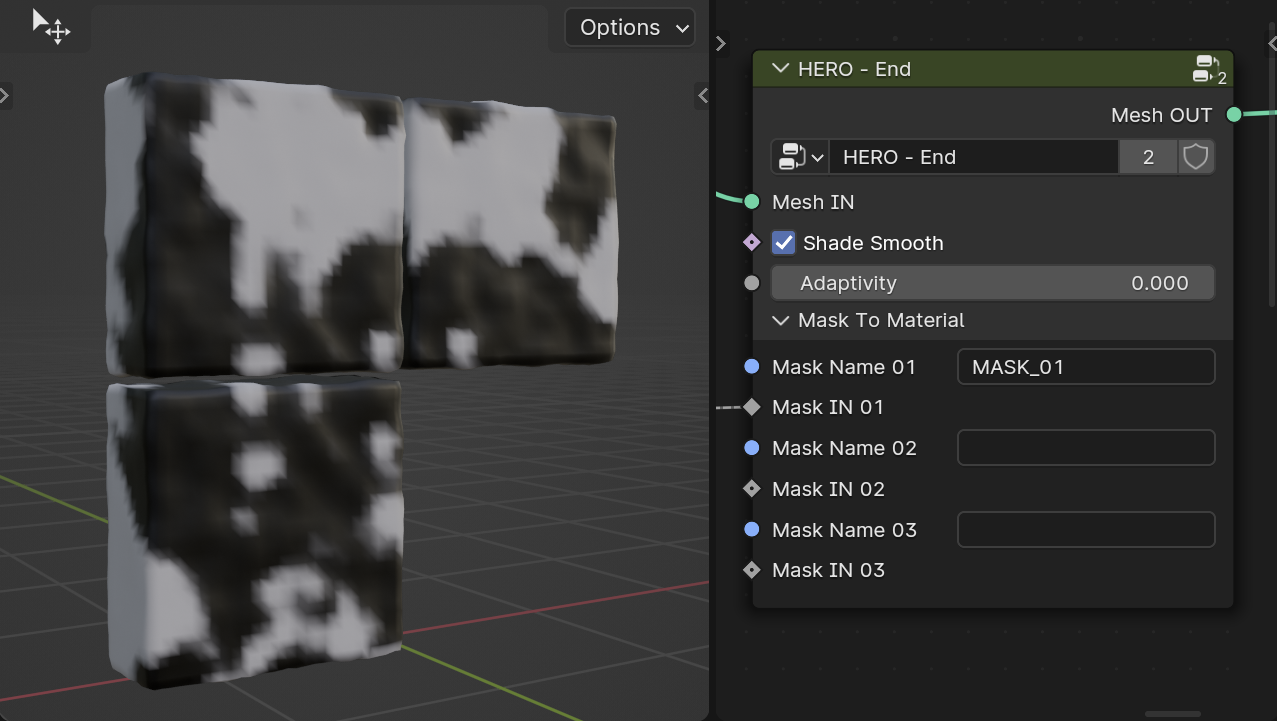
Note
In the Shader Editor, use an Attribute node with the same name you've written to access the mask.
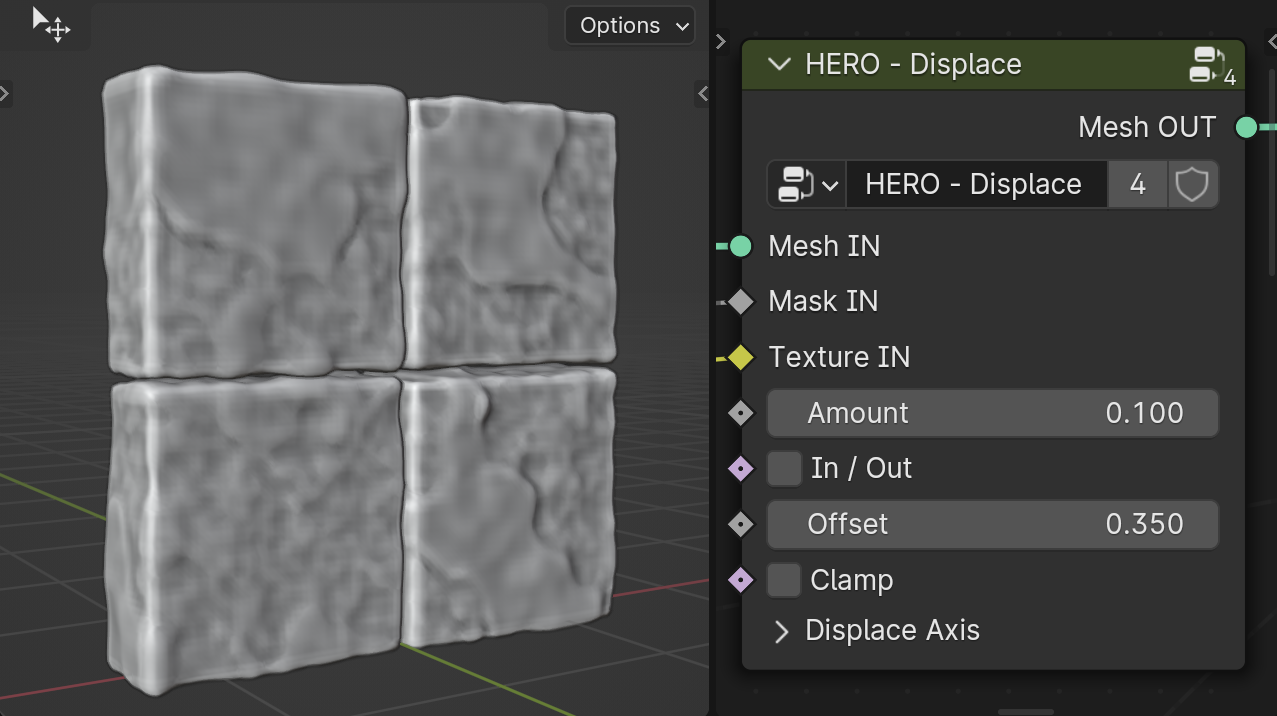
HERO - Displace
The HERO - Displace node is key for adding details to your model. Feel free to use multiple displace nodes to layer detail, controlling them with HERO - Masks. Each Displace node acts like a layer of detail.
Note
In certain situations, the HERO - Displace node can be used without the HERO - Start/End chain.
Mesh IN
Use the Mesh IN socket to input your mesh.
Note
For the first HERO - Displace node, connect the Mesh OUT socket from HERO - Start as the input to the HERO - Displace Mesh IN socket.
Mask IN
The Mask IN socket is where you input your HERO masks.
Texture IN
The Texture IN socket is for connecting a Texture node.
Note
You can use a Texture without a Mask input, or a Mask without a Texture, depending on what you need.
Amount
The Amount slider adjusts the displacement intensity based on the input Texture. It can be set to negative values for inverse displacement effects.
Note
Holding the Shift key while adjusting sliders allows for finer, smaller changes.
In/Out
The In/Out checkbox lets you toggle the direction of the displacement.
Offset
The Offset slider allows you to adjust the displacement value independently of the Texture's intensity.
Note
The Offset slider is also useful for applying displacement with just the mask input, without relying on texture intensity.
Clamp
The Clamp checkbox limits the range of displacement values.
Displace Axis
The Displace Axis checkboxes allow you to restrict displacement to any of the three axes (X, Y, Z) in local coordinates. By selecting or deselecting these boxes, you can enable or disable displacement on each axis individually.
HERO - Scatter
The HERO - Scatter node enables users to employ scattered images as a guide for displacement on surfaces, creating varied effects.
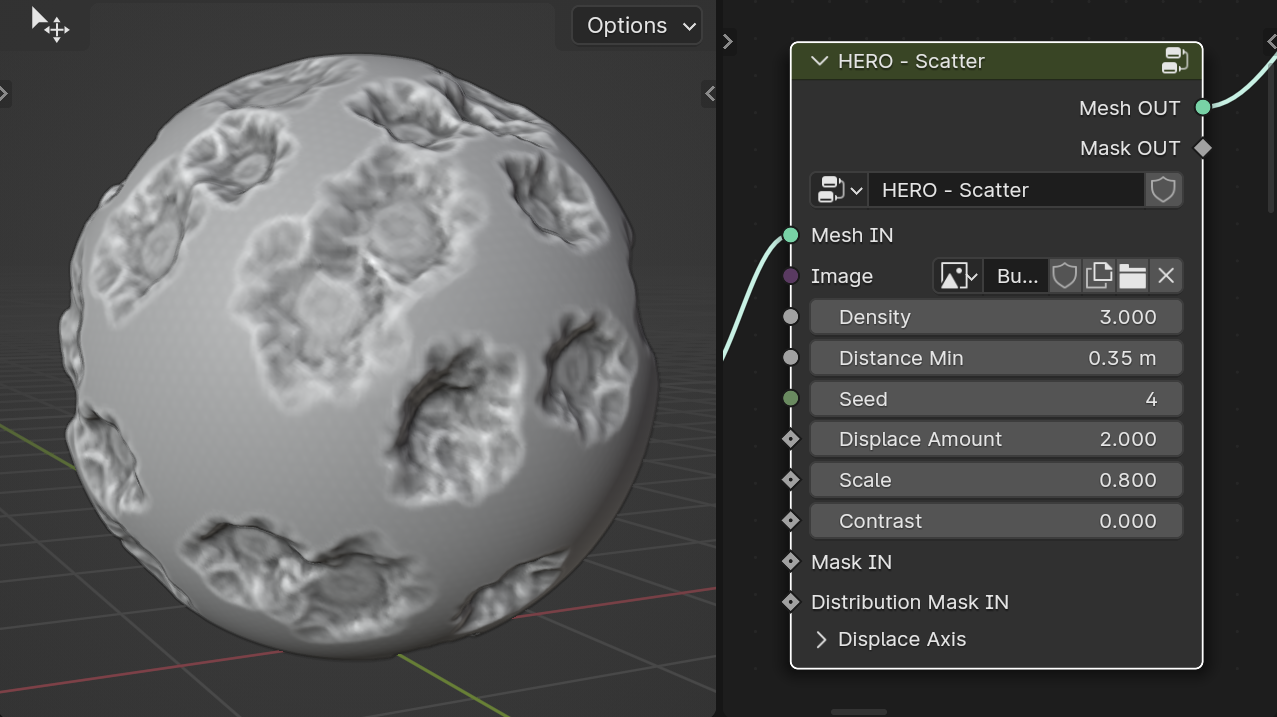
Image
In the Image field, select the image for displacement.
Density
The Density slider adjusts the scatter points' density.
Distance Min
The Distance Min slider sets the minimum distance between scatter points to avoid overlapping.
Seed
The Seed value randomizes the placement of scatter points.
Displace Amount
The Displace Amount slider adjusts the level of displacement and can be set to negative values.
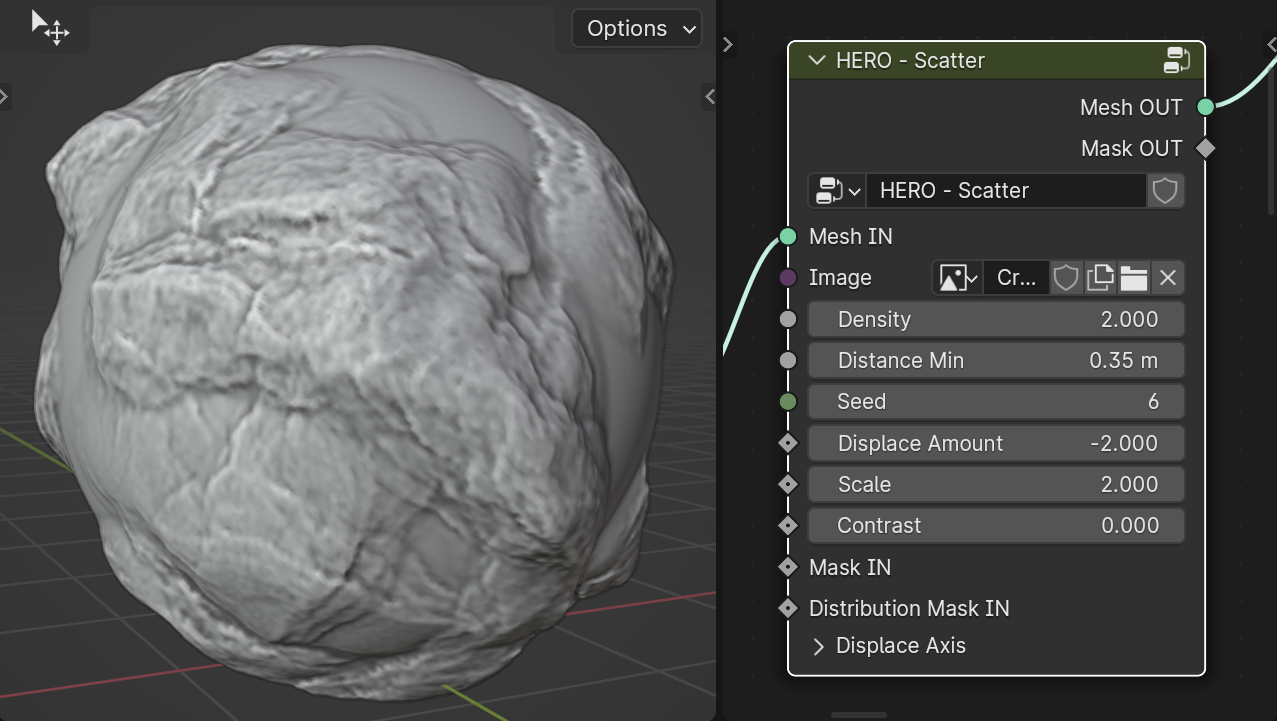
Scale
The Scale slider adjusts the size of the displacement image.
Contrast
The Contrast slider adjusts the sharpness and contrast of the image borders.
Mask IN
The Mask IN input allows for masking the displacement effect in specific areas.
Distribution Mask IN
The Distribution Mask IN input controls the distribution of scatter points by masking certain areas.
Displace Axis
The Displace Axis checkboxes allow you to restrict displacement to any of the three axes (X, Y, Z) in local coordinates. By selecting or deselecting these boxes, you can enable or disable displacement on each axis individually.
Mask OUT
The Mask OUT output socket allows using the image as a mask for other nodes.
Note
The Mask OUT functions as a mask even without activating displacement.
HERO - Image Displace
The HERO - Image Displace node enables displacement using an image, with control over its position through an Empty object.
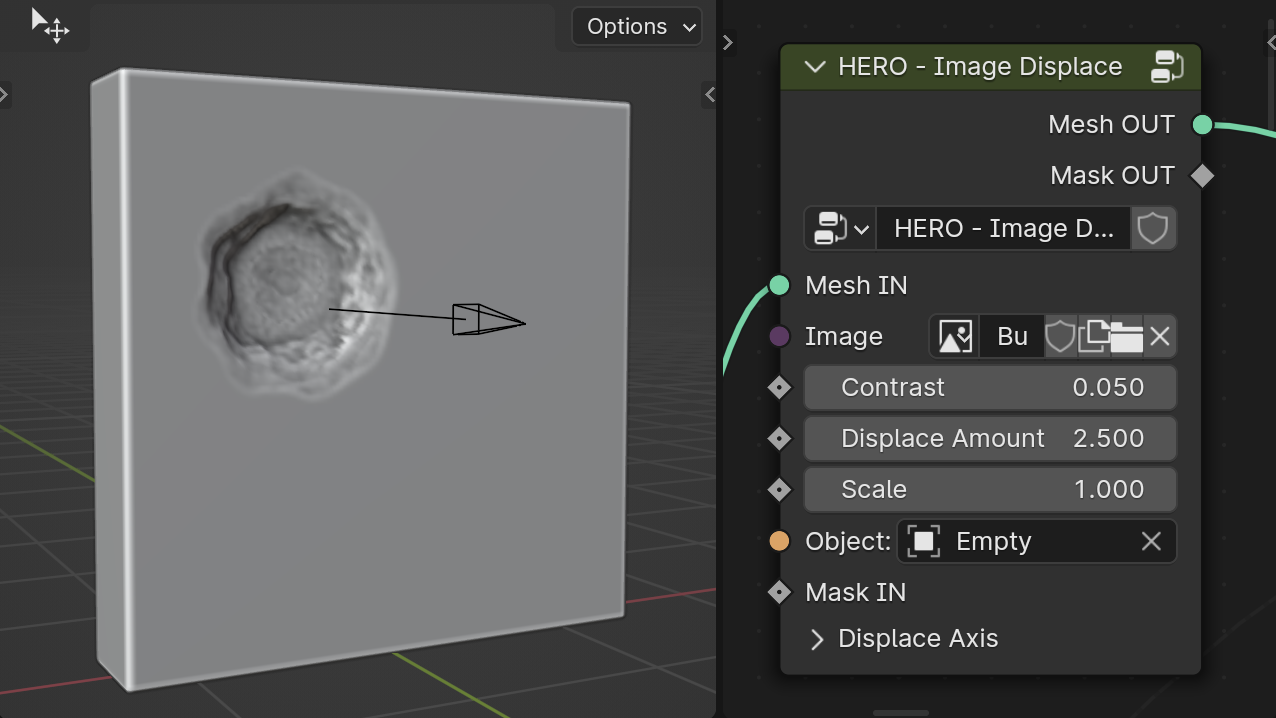
Image
In the Image field, select the image for displacement.
Contrast
The Contrast slider adjusts the sharpness and contrast of the image borders.
Displace Amount
The Displace Amount slider adjusts the level of displacement and can be set to negative values.
Scale
The Scale slider adjusts the size of the displacement image.
Object
The Object input selects an object to control the displacement position on the surface.
Mask IN
The Mask IN input allows for masking the displacement effect in specific areas.
Displace Axis
The Displace Axis checkboxes allow you to restrict displacement to any of the three axes (X, Y, Z) in local coordinates. By selecting or deselecting these boxes, you can enable or disable displacement on each axis individually.
Mask OUT
The Mask OUT output socket allows using the image as a mask for other nodes.
Note
The Mask OUT functions as a mask even without activating displacement.
HERO Masks
HERO - Mask is a crucial component of the HERO Module. It allows you to create a wide range of surfaces, from man-made textures to natural ones, offering versatility in your detailing process.
HERO - Noise Mask
The HERO - Noise Mask creates patterns using procedural noise, giving a varied and organic appearance.
Seed
The Seed value lets you easily change the noise pattern, giving your surface a fresh appearance.
Detail
The Detail slider influences the complexity of the noise within the mask, affecting how intricate or smooth the transition areas are.
Inverse
The Inverse checkbox reverses the mask effect.
Offset
The Offset slider adjusts the mask to either expand or contract its coverage.
Contrast
The Contrast slider controls the sharpness of the mask border, making the edges more distinct or softer.
Global Coordinates
The Global Coordinates checkbox makes the mask use overall (global) positions. If it's not checked, it uses the object's own (local) positions.
Transform
The Transform section lets you move and resize the mask along its axes.
HERO - Gradient Mask
The HERO - Gradient Mask allows for the creation of both smooth and sharp transition effects, offering customizable gradients to suit various design needs.
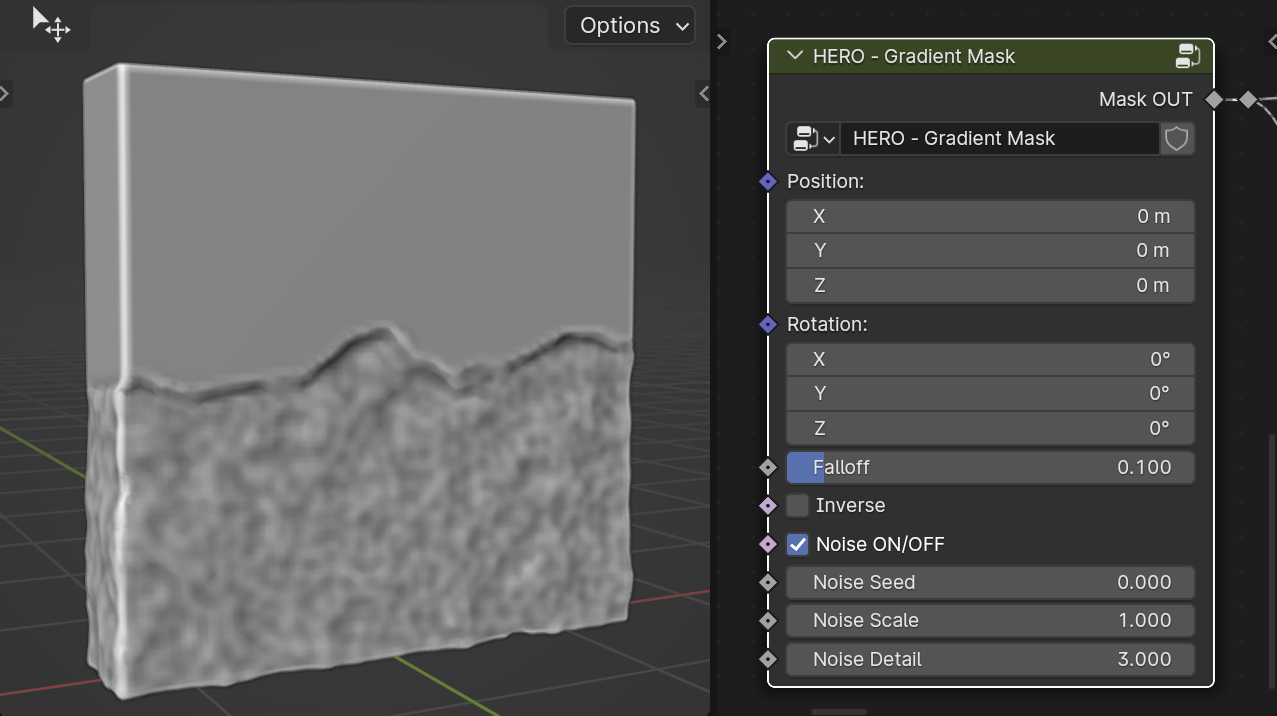
Falloff
The Falloff slider adjusts the sharpness of the mask's border, controlling how gradually or abruptly the mask transitions.
Inverse
The Inverse checkbox reverses the mask effect.
Noise On/Off
The Noise On/Off checkbox toggles the application of noise to the mask's border, adding or removing texture effects.
Noise Seed
The Seed value lets you easily change the noise pattern, giving your surface a fresh appearance.
Noise Scale
The Noise Scale slider adjusts the size of the noise pattern on the mask's border when noise is enabled.
Noise Detail
The Noise Detail slider influences the complexity of the noise within the mask, affecting how intricate or smooth the transition areas are.
HERO - Material Mask
The HERO - Material Mask uses the material assigned to the original object to create the mask.
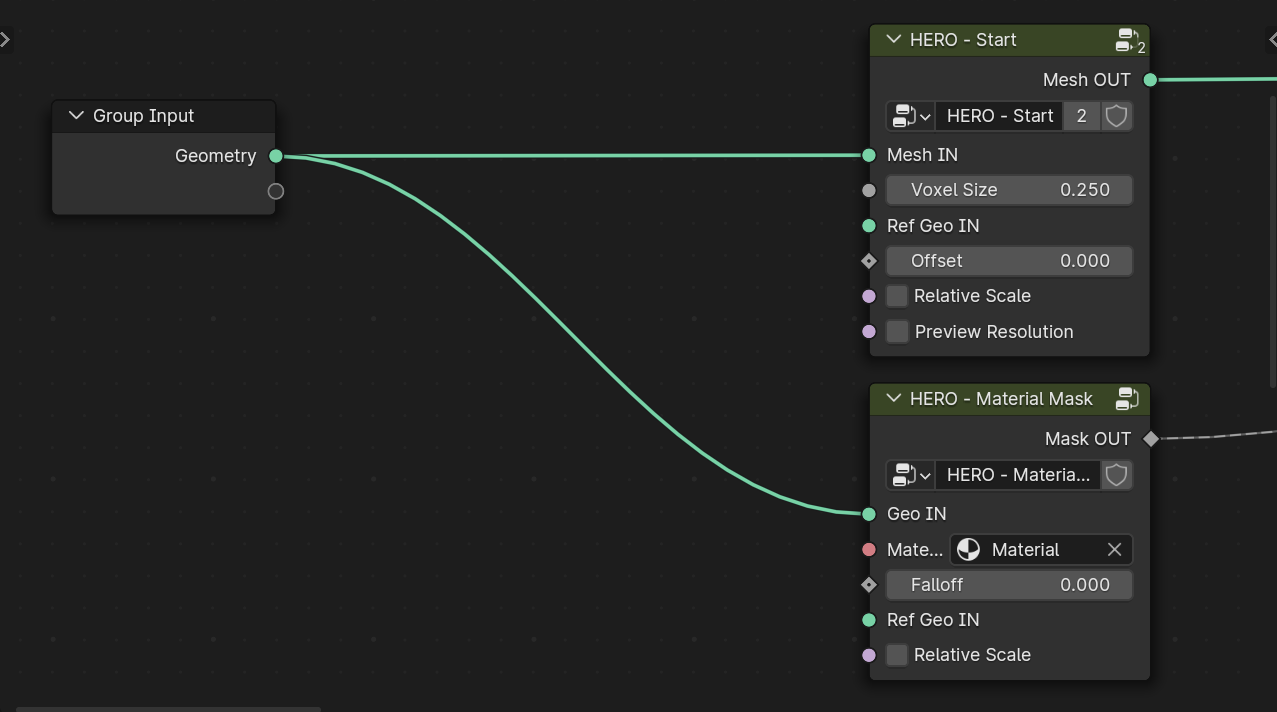
Note
For the HERO - Material Mask, use the original object's output socket to inherit material properties, not HERO - Start.
Material
Material Input: Choose a Material to use as a mask from this field.
Warning
The object must have at least two different materials assigned to its faces for the mask to work effectively.
Falloff
The Falloff slider adjusts the sharpness of the mask's border, controlling how gradually or abruptly the mask transitions.
Ref Geo IN
This input matches the one in the HERO - Start node. If you're using a reference object with HERO - Start, use the same object here for the Material Mask node.
Relative Scale
This works just like the one in HERO - Start. Make sure to use it in both places the same way.
HERO - Normal Mask
The HERO - Normal Mask, also known as a Directional Mask, creates a mask based on vector direction, targeting surfaces facing in a specific direction.
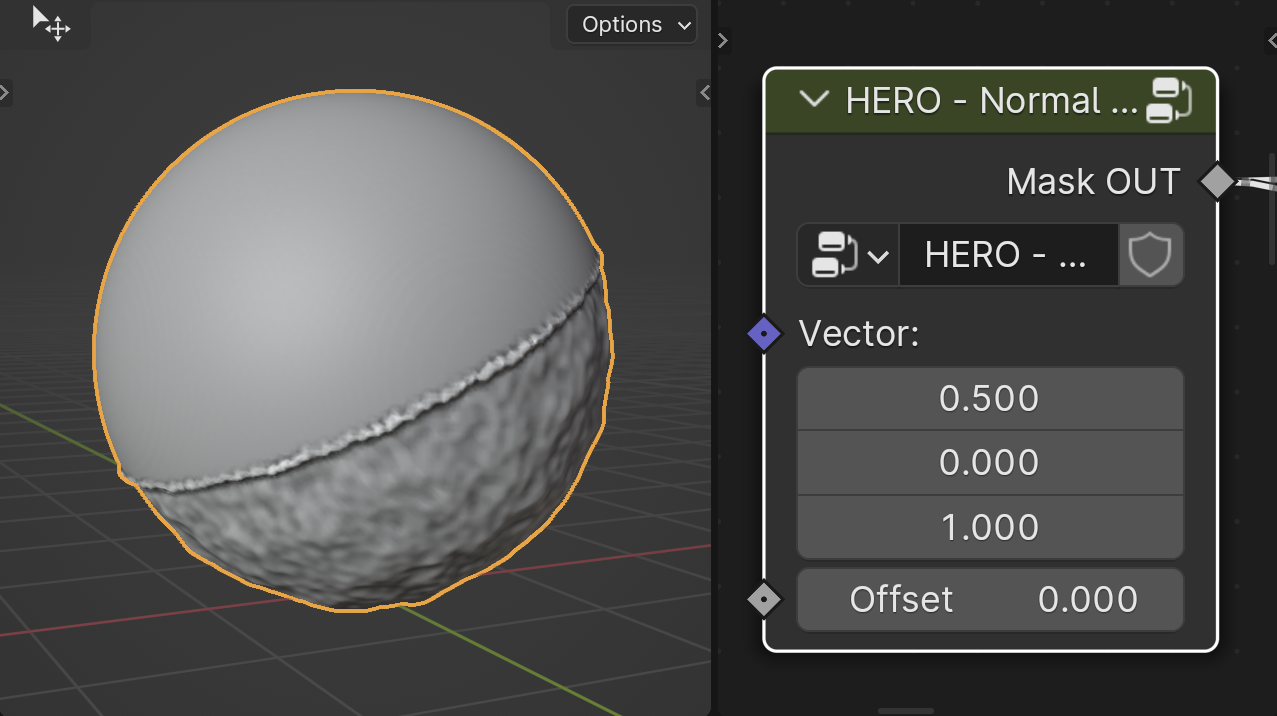
Vector
The Vector field allows you to select a direction for the mask using three axes.
Offset
The Offset slider lets you expand or shrink the mask.
HERO - Obj Pos Mask
The HERO - Obj Pos Mask uses the position of the input object to set the mask's location.
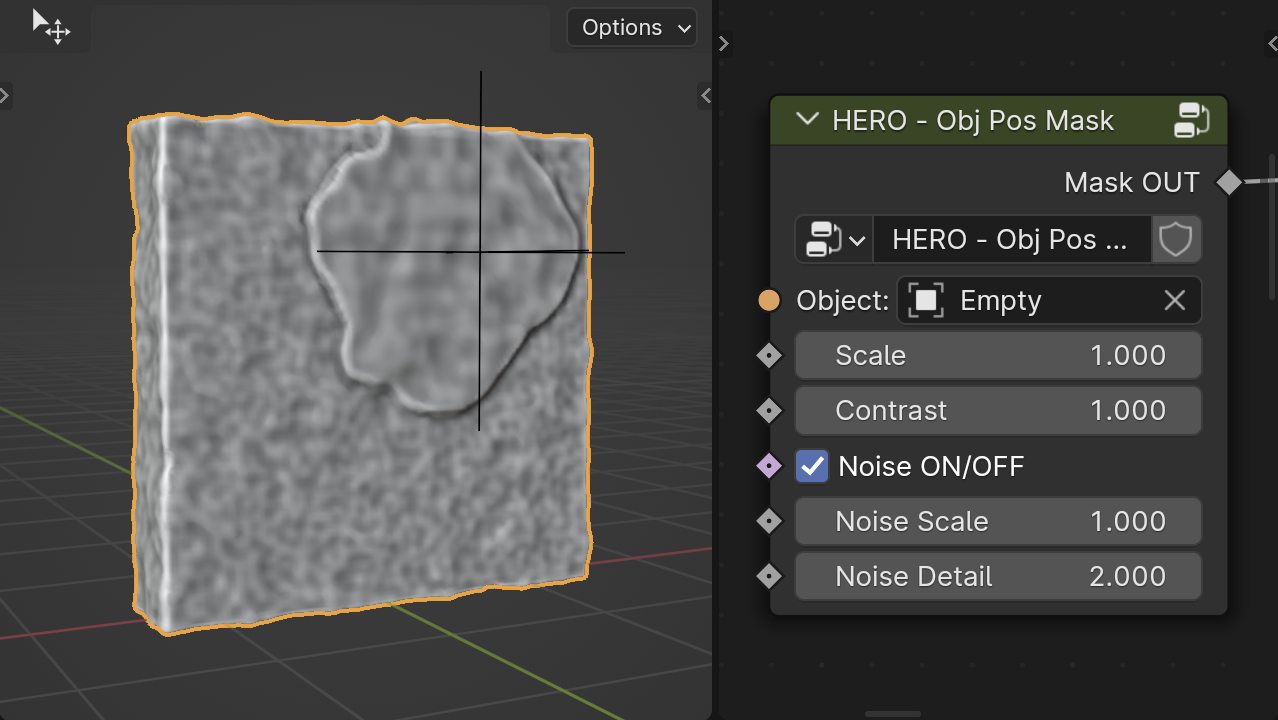
Note
While any object can be used as input, the mask only utilizes its position. Therefore, it's better to use an Empty object for this purpose.
Object
The Object field is used to select an object for the mask.
Scale
The Scale slider lets you adjust the size of the mask.
Contrast
The Contrast slider controls the sharpness of the mask border, making the edges more distinct or softer.
Noise On/Off
The Noise On/Off checkbox toggles the application of noise to the mask's border, adding or removing texture effects.
Noise Scale
The Noise Scale slider adjusts the size of the noise pattern on the mask's border when noise is enabled.
Noise Detail
The Noise Detail slider influences the complexity of the noise within the mask, affecting how intricate or smooth the transition areas are.
HERO Utils
HERO - Blur
The HERO - Blur node is used to smooth your geometry and can be positioned anywhere in the node setup, based on your needs.
Iterations
The Iterations setting acts as a multiplier for the intensity of the smoothing effect.
Weight
The Weight slider allows for finer adjustment of the smoothing amount.
HERO - Trimesh
The HERO - Trimesh node changes quads to triangles, useful for removing quad patterns or making low-poly models. Place it after HERO - End.
Density
The Density slider adjusts the triangle size in the mesh. Higher values result in larger, less dense triangles.
Mask Reducer
The Mask Reducer parameter controls the reduction of triangle count in the masked area specified by the Mask IN input, acting as a multiplier for the reduction intensity.
Seed
The Seed parameter randomizes the triangle placement pattern, which can help eliminate pinched areas in the mesh.
Mask IN
The Mask IN input specifies areas for varying triangle density using a mask. It's useful for creating regions with more detail and others with fewer polygons for reduced detail.
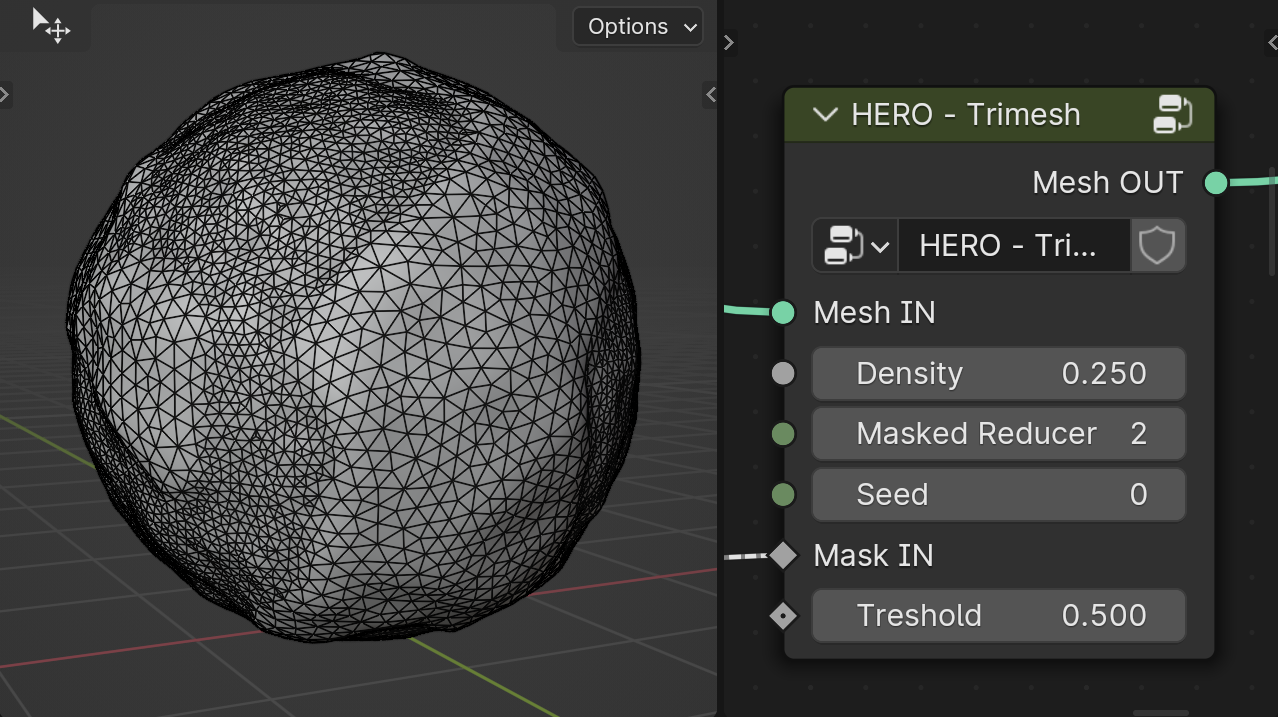
Treshold
The Threshold slider adjusts the size of the masked area, allowing it to expand or contract.
HERO - Texture Transform
The HERO - Texture Transform is a utility node designed to modify the vector input for a Texture Node

Position
Position: Adjusts the texture's location.
Rotation
Rotation: Alters the texture's orientation.
Scale
Scale: Modifies the size of the texture.
Global Coordinates
The Global Coordinates checkbox makes the mask use overall (global) positions. If it's not checked, it uses the object's own (local) positions.
Mod Texture IN
The Mod Texture IN socket allows you to connect a texture that modifies the main texture.
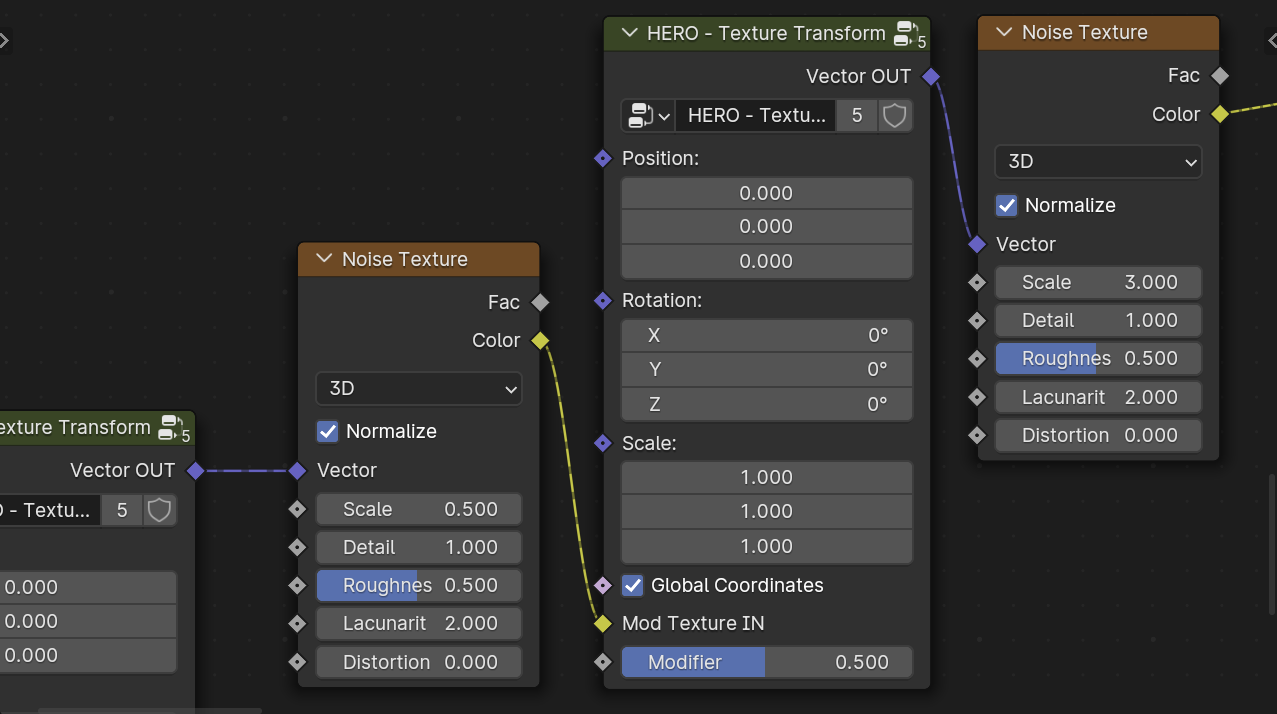
Modifier
The Modifier slider adjusts the level of impact the modification texture has on the main texture. Additionally, you can use a mask output as input for more precise control.
HERO - Mask Inverse
The HERO - Mask Inverse node reverses the input mask.
HERO - Mask Combine
The HERO - Mask Combine node is a utility for merging masks together. It offers options to add, subtract, and intersect masks for versatile mask creation.